
x264 Encoding Guide
I. Programs You Will Need:
Microsoft Visual C 2010 Redistributable Package - x86 and x64 versions
SupRip or Subtitle Edit or SubExtractor
Haali Media Splitter
eac3to
Arcsoft DTS Decoder
Avisynth
Avisynth Plugins
AvsPmod
x264
Chapter Grabber or you can use "HD-DVD/Blu-Ray Stream Extractor" for extract chapter.
MKVToolNix
HD-DVD/Blu-Ray Stream Extractor <= Copy eac3to to here.
Sony Sound Force with Dolby Digital Encoder
DTS-HD Master Audio Suite
eac3to Decoder Pack
-Guide for using eac3to: http://en.wikibooks.org/wiki/Eac3to/How_to_Use
-Remember to update x264, eac3to, ffms2 frequently
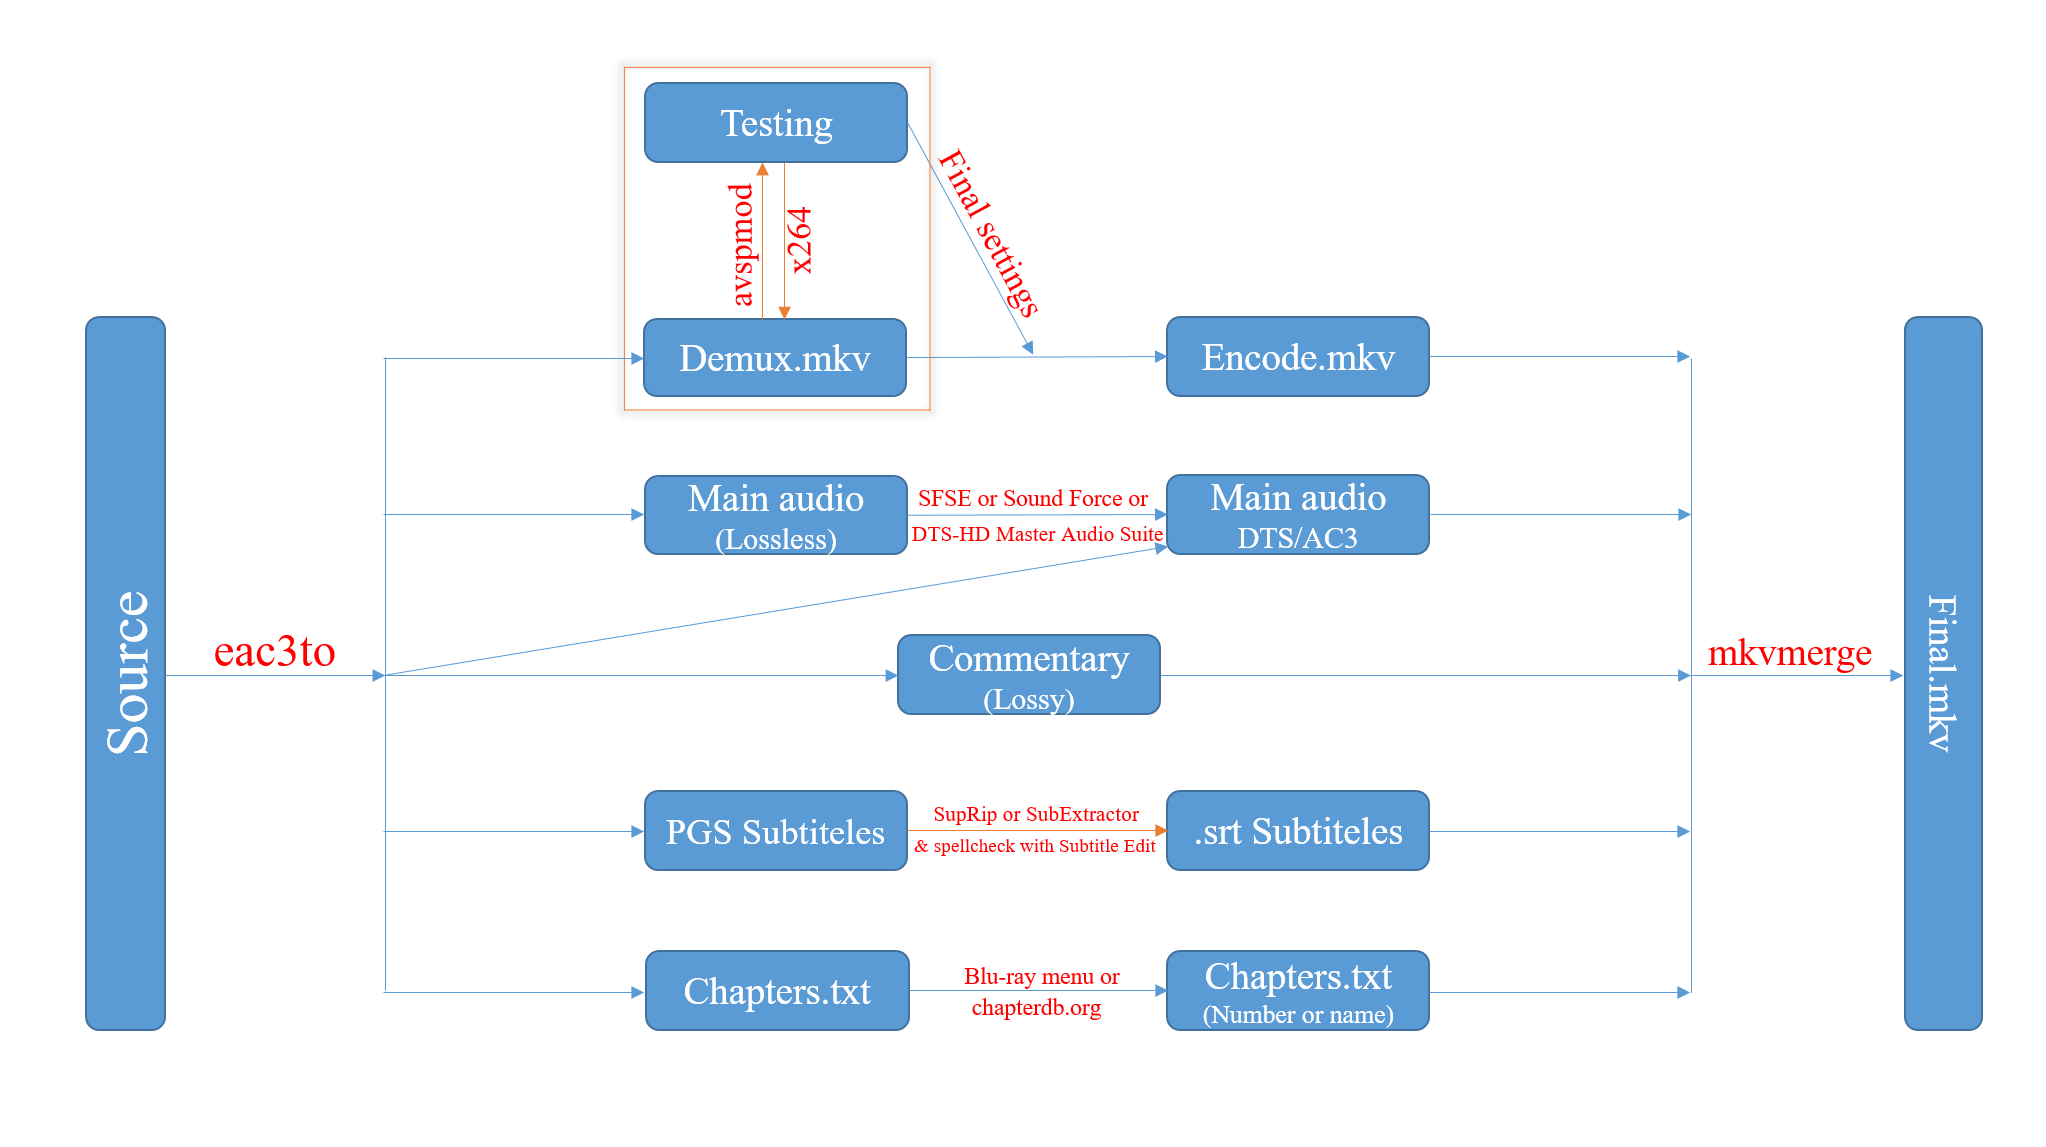
II. Demuxing the Source
Used HD-DVD/Blu-Ray Stream Extractor:

1. Chapter to chapter.txt
2. Video to source.mkv
3. Main Audio:
If the audio is DTS MA-HD, you want to keep the lossless audio, choise audio.dtshd.
If you want the encode to have DTS audio, choise audio.wavs.
If you want the encode to have AC3 audio, choise audio.w64.
If you want the encode to have AAC audio, choise audio.aac.
If you want the encode to have FLAC audio, choise audio.flac.
Also, if the audio is greater than 5.1 surround and your final audio format is not lossless, i.e., you are converting 7.1 PCM/DTS MA-HD/TrueHD to 5.1 AC3/DTS, there are some additional options you need to add to downmix the audio when decoding.
If the audio is 7.1, add -down6 after whatever you added, e.g. audio.w64 -down6.
If the audio is 6.1, add -down6 -0,1,2,3,5,6,4 after whatever you added, e.g. audio.w64 -down6 -0,1,2,3,5,6,4.
Options:
-448 use e.g. "192", "448" or "640" kbps for AC3 encoding
-768 use "768" or "1536" kbps for DTS encoding
-core extract the DTS core of a DTS-HD track
+/-100ms apply a positive or negative delay
-0,1,2,3,4,5 remap the channels to the specified order
-down6 downmix 7 or 8 channels to 6 channels
-down2 downmix multi channel audio to stereo (Dolby Pro Logic II)
-mixlfe mix LFE in (when doing stereo downmixing, see "down2")
-down16 downconvert decoded audio data to 14..23 bit
-slowdown reverse PAL speedup (25.000 -> 24.000/1.001 fps)
-speedup apply PAL speedup (24.000/1.001 -> 25.000 fps)
-resampleTo48000 resample audio to "44100", "48000" or "96000" Hz
-quality=4 slowdown/speedup/resampling quality (0 = low; 4 = very high)
-quality=0.50 Nero AAC encoding quality (0.01 = low; 0.99 = very high)
-8 PCM file has "1".."8" channels
-16 PCM file is "16" or "24" bit
-little PCM file is "little" or "big" endian
-96000 PCM file is "44100", "48000", "96000" or "192000" Hz
4. Commentary (if there's one) to commentary.aac (AAC 64 kbps)
5. Subtitles to language.sup
III. Transcoding Audio
This section assumes you followed the instructions for demuxing properly and thus have a resulting .w64 or set of .wavs files for use in this section. If not, skip this section entirely. This means you should have created a .w64 or .wavs file(s).
At this point the process is dependent on whether you decided you wanted DTS audio for your encode or AC3 audio.
1. Encoding DTS Audio:
Take the many WAV files for the main audio and put them into the Encoder Suite like this (each WAV file is a channel):

Take note that the Dialog Normalization box is set to -31 dBFS (No Attenuation). This means no dialog normalization will be applied. Also note that the encoder is set to output a .cpt file. If you are performing an HD encode and want lossless audio, change this to a .dtshd file. Otherwise, when the encoding process has finished, change the .cpt extension to .dts.
2. Encoding AC3 Audio:
Open up Sound Sound Forge and open the .w64 file you created with eac3to. It will take a few minutes for the audio to be processed. Once completed, go through the audio and highlight a region in the Center channel (usually the third stream in 5.1 sources) that has primarily dialogue (no music or sound effects). Make sure to only select the center channel, otherwise all six channels will be averaged and you will get an inaccurate value. Then click Process->Normalize. Click the Average RMS level (loudness) radio button and then press Scan Levels.
After a few seconds, a value should show up for the RMS (undernearh the Scan Levels button). Write down/remember this value. Now click Cancel. Make sure to click Cancel and not OK, otherwise Sound Force will normalize the audio.
Now click File->Save As. Make sure "Dolby Digital AC-3 Pro" is selected and the "5.1 Surround DVD" profile is selected. Now click the Custom... button. On the first tab, make sure the settings match below. Change the "Audio coding mode" setting to match your audio, e.g., pick 2/0 for stereo audio. Also make sure the "Data rate" is set to your desired bitrate. Stereo audio is often encoded at 192kbps, and surround audio is often encoded at 448kbps for SD encodes and 640kbps for HD encodes. Then set the Dialog normalization to the value you wrote down earlier. (In some cases, the value you calculated before may be below -31 dB. In this case just choose -31 dB in the dialog.)

Now go to the Preprocessing tab. Uncheck all input filtering and surround channel processing. Make sure that RF overmodulation protection is unchecked. For the Line mode profile, the recommended value is "Film: Light".
Some people do not like the idea of compressing the dyanmic range of the audio, and will recommend choosing None for the Line mode profile. The concern is understandable, but in most cases encodes are going to be viewed on computer speakers or in an amateur home theater (especially considering this is an SD encode if you're using Sound Force). Having the full dynamic range is unnecessary and will make the film unpleasant to listen to if there are any loud/soft noises. The choice is ultimately yours. You can read this article for more information

Finally, press OK and then Save the .ac3 file to the folder of your choice.
The resulting file will be your final main audio to be used later on down the line in muxing.
IV. Encoding video track:
1. Use AVSPmod to load the video stream, write the script like this: FFVideoSource("../source.mkv")
and then hit F5, ffms will index the source file. At this point AvsPmod will appear to be frozen. This is normal -- ffvideosource is indexing the video so it can be displayed properly. The process takes quite a while to finish. About 5 minutes later in your folder will have an index file (source.mkv.index), just leave it there.
2. Crop and resize the source if you want, then trim out the openning/credit and add the script for testing. Your AVS will look like this:
FFVideoSource("../source.mkv")
Crop(0,132,0,-132) #Crop all black bars
Spline36Rezise(1280,544) # Resize to 720p if needed
SelectRangeEvery(3000,300) # For testing only, erase this line when you want to do full encode
1280*Source Height/Source Width = Encode Height
720*Source Width/Source Height = Encode Width (use when you encounter 4:3 source, or source that have large blackbar at right and left side)
Trim(Start Frame, End Frame) means you only keep the frame numbers you specify, this is useful to select a range of frames within the movie. SelectRangeEvery(3000,300) means every 3000 frames you take 300 frames for the test sample (ie your testing sample will have 1/10 movie length)
Save your script as "source.avs"
3. Open Notepad, write down your x264 settings. You can use this template:
With CRF:
D:\bodoicuho\x264 Source.avs --crf 16.3000 --level 4.1 --preset placebo --bframes 11 --deblock -3:-3 --psy-rd 1.05 --aq-strength 0.70 --qcomp 0.70 --no-mbtree --output "VietHD.mkv" - 2> VietHD.log
With 2 Pass:
D:\bodoicuho\x264 Source.avs --pass 1 --bitrate 9500 --stats ".stats" --level 4.1 --ref 11 --no-fast-pskip --bframes 13 --b-adapt 2 --direct auto --deblock -3:-3 --aq-strength 0.70 --no-dct-decimate --no-mbtree --output NUL - 2> pass1.log
D:\bodoicuho\x264 Source.avs --pass 2 --bitrate 9500 --stats ".stats" --level 4.1 --preset placebo --bframes 13 --deblock -3:-3 --psy-rd 1.05:0.0 --aq-strength 0.70 --qcomp 0.70 --no-mbtree --output "VietHD.mkv" - 2> VietHD.log
Depending on the source, you can change those settings: bitrate, ref, bframes, aq-strength, psy-rd. Leave all other settings alone as the are advanced and this is only a beginner tutorial. Sometime you need to use other settings though (like ipratio, pbratio, qcomp, zones...) but this template can do a good job for most sources. Check out for other settings here: https://en.wikibooks.org/wiki/MeGUI/x264_Settings
Save those settings as "encode.bat" and place it in the same folder as source.avs file
Note: Explanation of the five most important settings
--me/--merange: The --me and --merange options determine the methods of motion estimation. When compressing, x264 will scan the video and try and determine motion patterns in the video. By finding these "motion vectors", x264 is able to compress further between frames.
The --me option sets the algorithm x264 uses for motion estimation. When using the settings mentioned above (i.e., Preset set to Placebo), this setting is set to "tesa", the most intense setting. The --merange option sets how many frames x264 will scan. The above default settings sets this to 32.
Higher --me settings are very slow. Sometimes it may be in your best interest to lower the --me setting and, as compensation, raise the --merange setting. Firstly, never set --me to anything below "umh". Below is explanation of the different --me modes, and why/when you should use them:
+ --me umh --merange 32/48 - This much faster than other settings. Additionally, for movies with lots of motion, e.g., action movies, the motion in the video is obvious enough where you don't need to go any higher than this setting.
+ --me esa --merange 32 - Basically a faster version of the defaults given before. The --merange setting is the same, but --me is set to "esa", which is one step lower than "tesa" (the default). Use this if your CPU sucks.
+ --me tesa --merange 16 - This uses "tesa", just like the default, but lowers the --merange value. This is useful for low motion films, where an increase in the amount of frames analyzed will not help.
+ --me tesa --merange 32 - This is the default value. If you were to just use the settings given in this guide and not change anything, this is equivalent. It is very slow, but covers all cases.
--bitrate: well it's pretty obvious. Use your eyes checking comparison between test encode/source and choose what bitrate you should use, not just looking at the quants. The more grainy and colorful the film is the more bitrate it will need. With Animation and CGI stuff if your encode doesn't have enough bitrate it will cause a lot of banding in the background/low details areas. Use the tool called Bitrate Calculator(in MeGUI) if you want to set a specific file size for your encode (DVD5, DVD9) for example.
--bframes: check out the consecutive B-frames in your 1st log of your test encode. Example:
x264 [info]: consecutive B-frames: 0.8% 1.4% 7.2% 23.0% 19.4% 43.4% 3.6% 1.3%
Raise bframes until the last percent is below 5% (for the most significant compression)
--psy-rd: useful for all material, especially grainy movie (don't even think about disabling it!). I recommend this range 0.8--->1.2 for film and 0.5--->0.8 for animation. I personally don't recommend using the second value (psy-trellis) as it will often sharpen and will add progressively more artifacts to the image the higher the value. Choose what you think it's best for your source.
--aq strength: Set the strength of AQ bias towards low details areas. Example: The face of a character is considered a complex detail area, while the background behind them (sky, dark shadow..etc) is consider low details area. Lower value than default value(1.0) will make his face looks better while the background will look bad compared to the source, and vice versa. For the best pq benefit, I recommend 0.7--0.9 for film, 0.5-0.7 for grainy movie, 0.9-1.1 for animation
--vf: If your video is not progressive, you cannot use this option. This allows you to crop and/or resize your source video without the need for using an AviSynth script. Do not use this parameter in your test encodes, only for the full encode. When you perform the full encode, copy the crop and resize numbers to x264. Remember to crop before resizing. The syntax is as follows:
--vf crop:{left},{top},{right},{bottom}/resize:{width},{height},{sar},method=spline
Replace the {left}, {top}, {right} and {bottom} with your crop settings and {width}, {height}, and {sar} with your resize values and SAR. (If you are encoding from Blu-ray, make the SAR "1:1".)
5. Run encode.bat file to do the test encode. When the test encode is finished, use AVSPmod to load the source.avs file and the encode.mkv file then compare them (use ffmpegsource2 for the test encode, it's easier to compare). Add FFInfo(cfrtime = false, vfrtime = false) for OSD (current frame and frame type)
If you think your test encode is good, then erase "Trim(Start Frame,End Frame).SelectRangeEvery(3000,100)" in your source.avs file and run encode.bat again to do full encode.
V. Ripping Subtitles
Used SupRip or Subtitle Edit or SubExtractor for orcing the *sup file.
VI. Muxing Everything Together
Open MKVMerge. Click File->Options, and in the Options dialog make sure Disable header removal compression for audio and video tracks by default is checked,
Now drag all necessary files - the video you encoded, main audio stream, commentary audio, and subtitles - into the Input files box.
- Each track should have the correct language set.
- Commentary audio and SDH subtitle tracks should be given an appropriate track name.
- If your encode has commentary audio, make sure Default track flag is set to yes for the main audio stream.
- Unless the movie is in a language other than English, Default track flag should be set to no for all subtitle tracks.
- All video and audio tracks should have Compression set to none in the Extra options tab. If you checked off the option mentioned above, it should already be preset to that by default.
Now go to the Global tab and enter the name of the Movie in "File/segment title". Under Chapters, click Browse and select the chapter.txt. Set the language and Charset appropriately (usually eng and UTF-8, respectively).
Name your output file, and click Start muxing. The muxing process will take several minutes.
VII. Other stuff:
1. Information about the x264 log from Dark Shikari
avis [info]: 1280x544 @ 23.98 fps (239470 frames)
Information about the input file (resolution, framerate, number of frames).
x264 [info]: using cpu capabilities: MMX MMXEXT SSE SSE2 3DNow!
Your processor is an Athlon 64 and it supports the aforementioned processor extensions used by x264.
x264 [warning]: VBV maxrate specified, but no bufsize.
You're specifying a maximum bitrate but no buffer size. If you're encoding for a specific hardware device, you should specify the appropriate buffer size along with the max rate.
mp4 [info]: initial delay 834166 (scale 10000000)
Some sort of delay value relating to the mp4 muxing.
x264 [info]: slice I:2323 Avg QP:19.01 size: 78885a 0:00:00
x264 [info]: slice P:101512 Avg QP:21.38 size: 28261
x264 [info]: slice B:135635 Avg QP:22.36 size: 9179
The number of each frame type. Also the average quantizer value for each of the frame types. Lower QP generally means better quality at the cost of more bitrate.
x264 [info]: mb I I16..4: 19.1% 75.0% 5.9%
x264 [info]: mb P I16..4: 6.8% 17.0% 1.1% P16..4: 36.9% 6.0% 7.8% 0.0% 0.0% skip:14.4%
x264 [info]: mb B I16..4: 0.3% 1.0% 0.2% B16..8: 26.6% 2.0% 4.4% direct: 4.5% skip:61.0%
This shows you the various types of partitions used for each of the different block types. For example, 5.9% of the I-frame partitions are 4x4 blocks. This is controlled by the --partitions commandline.
x264 [info]: 8x8 transform intra:68.8% inter:73.5%
Since you used the -8x8dct commandline, this section documents how often the 8x8 transform was actually used.
x264 [info]: direct mvs spatial:96.3% temporal:3.7%
Since you used --direct auto, the default, this states how often either --direct spatial or --direct temporal were used as chosen by the encoder.
x264 [info]: ref P 68.0% 17.8% 6.6% 4.6% 2.9%
x264 [info]: ref B 83.3% 10.7% 2.9% 1.9% 1.2%
You used 5 reference frames in your encoding, and this shows how often they were used for P-frames and B-frames. This is good for seeing how useful each extra reference frame is.
x264 [info]: kb/s:3441.8
The bitrate of the raw H.264 stream.
encoded 239470 frames, 3.55 fps, 3441.84 kb/s
The framerate that the video was encoded at (i.e. how fast x264 encoded the video) and the final bitrate including the mkv muxing overhead.
2. AVSP for making screenshots to compare (Source vs Encode)
Use Script for AvsPmod: FFInfo(cfrtime = false, vfrtime = false).Subtitle("VietHD",y=37)

* For encode.mkv
a. Load encode.mkv with AvsPmod and creat bookmark frames (you want to compare) with hotkey Ctrl+B, like that:

b. Like that and done:

* For source.mkv like Encode.mkv.
P/s: always use frame B to compare.
3. Make Descriptions like me

a. Download MediaInfo 0.7.48 and extract.
b. Run MediaInfo.exe
c. Right click => Select All (Ctrl + A) and copy to your site for test and edit:

d. If you want to edit my form, you can click in the Preferences (Ctrl +P) => Custom => Edit (General, video, audio, text) if you want.
